Getting your warehouse storage right starts with a solid foundation. Assembling pallet racking correctly is not just about following instructions; it’s about ensuring safety, maximizing efficiency, and protecting your inventory. A poorly assembled rack system is a significant hazard.
This walkthrough breaks down the process into clear, actionable steps. We focus on practical advice and crucial safety checks to guide you from unboxing to final inspection.
Before you touch a single beam or upright, planning is essential. Rushing the setup phase is the most common mistake in pallet rack assembly.
Start by reviewing all manufacturer drawings and manuals. Ensure you have received all the correct components. Check the part numbers against your packing list.
Next, confirm your floor plan. The assembly area must be clean, level, and clear of obstructions. Verify that the rack footprint matches your planned aisle widths and room for loading equipment.
Gather your tools beforehand. You will typically need a rubber mallet, a level, a tape measure, and wrench sets. For some systems, a forklift or scissor lift is necessary for placing heavy beams.
Safety cannot be an afterthought when installing warehouse racking. The weight capacities and structural integrity of the system depend entirely on correct assembly.
Ensure all personnel wear appropriate Personal Protective Equipment (PPE). This includes steel-toed boots, hard hats, and high-visibility vests.
Designate a controlled assembly zone. Use safety tape or cones to prevent untrained staff from wandering into the area where components are being lifted and secured.
Never work under unsecured loads or partially assembled frames. The connection between upright frames and beams must be fully engaged before any weight is applied.
Always assume components are heavier than they look. Use proper lifting techniques or mechanical aids to move uprights and long beams.
Let’s walk through the core process of putting together pallet racking. While specifics vary by manufacturer, the general sequence remains consistent.
Step 1: Lay Out the Components
Position your first two upright frames (the vertical columns) flat on the ground, facing each other. Have your first set of beams and safety locks (like beam safety clips or bolts) ready.
Step 2: Connect the First Beams
Start with the lowest beam. Lift it into position between the two uprights at the desired height. For clip-style systems, align the beam end connector with the hole or slot on the upright and tap it firmly into place with a rubber mallet. Immediately secure the safety lock.
Step 3: Create a Stable Frame
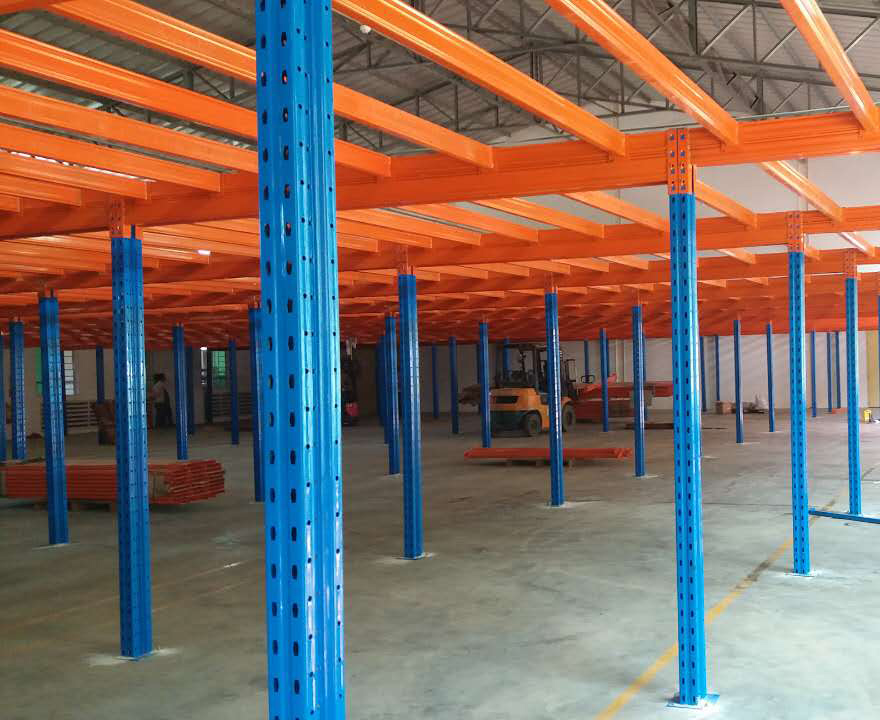
Repeat the process for the top beam. Once two beams are connected, you have a basic freestanding frame. Carefully stand this A-frame up. This is a two-person job. Use a forklift for very large frames.
Step 4: Ensure Plumb and Level
With the frame upright, use a level to check that it is perfectly vertical (plumb) on all sides. Adjust the footing if necessary. An unplumb frame will transfer weight incorrectly and is dangerous.
Step 5: Add Subsequent Frames and Beams
Stand your second upright frame a bay-width away. Use your next set of beams to connect this new upright to the first frame, creating the first full bay. Repeat this process to build out the entire run of racking.
Step 6: Install Row Spacers and Braces
Most multi-row installations require row spacers or cross braces to connect the backs of rows together. This adds crucial lateral stability to the entire structure. Never omit these components.
Step 7: Finalize with Wire Mesh or Decking
If your design includes wire mesh decking or solid shelves, install them now. Ensure they are properly seated and secured according to the manual.
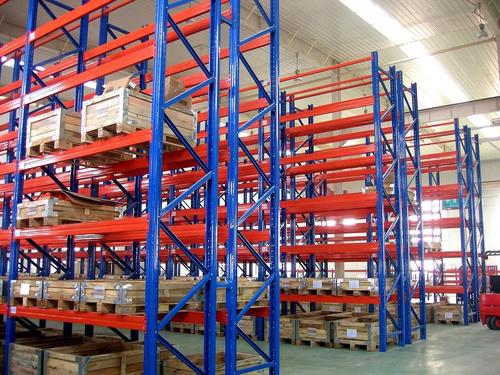
Once the main structure is up, step back and inspect the entire installation. Walk down each aisle and look for any visible leans or misalignments.
All frames should be in a straight line. Beams should be level and at identical heights across the run. Double-check that every single safety lock is fully engaged.
This is the time to make minor adjustments. Do not proceed to loading if anything looks off. The integrity of pallet rack assembly depends on precise alignment.
Your first load is a test. Start with the lowest beam level and place pallets evenly, centered on the beams. Do not exceed the stated maximum load per beam or per level.
Schedule regular inspections. Look for damage from forklifts, loose connectors, or any signs of deflection. A formal audit should be conducted at least annually.
Remember, assembling pallet racking is just the beginning. Proper use and maintenance are what keep your operation safe and functional for years to come.
Q1: How many people are needed for assembling pallet racking?
A1: For standard racking, a minimum of two competent people is required for safe handling and lifting of components. For larger, heavy-duty systems or when using mechanical lifting equipment, a crew of three or more is often safer and more efficient.
Q2: What is the most common error during pallet rack assembly?
A2: The most frequent and dangerous error is failing to properly install all safety locks or bolts. This includes beam connectors and row spacers. A beam resting on clips without its safety lock engaged can dislodge if impacted, leading to a potential collapse.
Q3: Can I use impact wrenches or power tools to tighten bolts?
A3: It is critical to follow the manufacturer's specifications. Overtightening bolts with an impact wrench can strip threads or damage components, compromising the rack's integrity. Manual torque wrenches set to the specified level are often recommended for final tightening.
Q4: Is it safe to modify or alter the racking after assembly?
A4: No. Do not drill new holes, cut, weld, or otherwise modify uprights or beams. Any modification voids the manufacturer's engineering specifications and warranty, and can catastrophically weaken the structure. Use only compatible, manufacturer-approved accessories.
Q5: How do I know if my floor is suitable for pallet racking?
A5: The floor must be level and have adequate load-bearing capacity for the fully loaded rack weight. A professional site survey is highly recommended before installation. Significant floor slopes or weak concrete will require remediation before safe warehouse racking installation can proceed.

 Wechat
Whatsapp
Wechat
Whatsapp


